
The planning for this trip started back in December of 2014, all fired up about it I had done quite a bit of research. After deposits were paid my mind turned to gear and to thoughts of how the weather would be, what the terrain would be like, the mighty reindeer raced across the tundra in my dreams.
 Departure date finally arrived, all the time spent sorting, shooting, weighing, and contemplating had come to an end. I sat at my gate awaiting my first flight sending off last minute emails and updates to the forum. I was anxious and excited, "what did I forget" voice nagging in the back of my mind. It would later turn out that I had indeed forgotten something, so maybe I need to listen to that voice a little more closely.
At that point the Caribou reports coming off the North Slope were not good. Weather was odd, bugs were down, the herd-up and migration had not materialized. Small groups of 'bou were being seen scattered about the tundra. I wondered, as I got caught up before the flight, what I would find.
 My initial flight was a short one to a connector in Minneapolis, from there direct to Fairbanks. It was a rainy, gloomy day and a precursor to the weather I was walking into in Alaska.
The flight is a long one, just under six hours and cuts a corner out of Canada along the way. At 37,000 feet there appears to be little other than lakes and wilderness below.

We dropped from our relatively clear weather into Fairbanks, of course it was cloudy and raining. Landing was uneventful. Happy to be back on the ground I grabbed my gear and headed for the rental cars, snapping the below as I passed out of the baggage claim area.

The plan was to overnight at a local hotel, then pick up the 'transport module' and head up the fabled Dalton Highway, also called 'The Haul Road'. First night was spent in the comfort of the Alpine Lodge Hotel in Fairbanks, mere minutes from the airport. As a plus, the Alpine Lodge offers amenities to hunters that you don't find at most hotels, like a freezer for your meat, clean up area, rack and gear storage, high pressure wash as well as a game cleaning station. There is also the 'Finish Line' restaurant behind the hotel with reasonable food and cold beer. Of note, the Alpine also keeps you well abreast of exactly where you are;

The Haul Road
The drive up the Alaskan interior was as much of an attraction as the caribou hunt on the North Slope.


When it was all said an done, over 1,100 miles were driven, an adventure in itself! Along the way the Arctic Circle would be crossed and on the return a night camped on the circle, Coldfoot, Wiseman, and Chandalar, as well as the northern most spruce tree in existence, then through the Atigun Pass and on to the tundra. Stopping about 55 miles south of Prudhoe Bay where the float plane would fly still further into the wilderness.
Visual log of the drive up the Haul Road.


Arriving at the outfitter's demarcation point at around 11:30pm after driving for close to twelve hours I was dragging. No amenities here, nor would there be for the next 10 days. So I hastily set up the Kifaru Megatarp, tossed by sleeping bag in place and inflated the neoair xtherm pad, I was asleep almost right away. Wind was up, fog to the ground, temps in the 30s and rain falling.
The next day was more of the same, fogged in again and the pilots were not flying. I didn't take many pictures, the landscape was nil, visibility not much beyond a hundred yards, camp was cold and damp and windy.
My shelter, DustinF's behind and left, with Throc's on the right in the back.

This was the scene the next morning, dawning cold with a good frost on.


The bushpilot had others to get into the field so it was time for some coffee. The wind on the tundra was on the high side of excessive, so 'Throc' knocked together a wind break from scavenged wood around the outfitters base.

A camp visitor....

Eventually the outfitter was caught up and it was our turn to fly out. The weather had been excessively bad and hunters were trapped on the tundra. When it was time to go I learned that I'd be going to the furthest lake he had in the area, called Cache One Lake which lay at the foot of an unnamed mountain range and about a mile north of the Echooka River.


I watched the float plane get off the water and go for altitude, as he faded from sight I turned, I started up the rise from the lake in order to get camp started and I nearly stepped in a pile of grizzly scat.
I grinned ear to ear.
To be continued...
 Departure date finally arrived, all the time spent sorting, shooting, weighing, and contemplating had come to an end. I sat at my gate awaiting my first flight sending off last minute emails and updates to the forum. I was anxious and excited, "what did I forget" voice nagging in the back of my mind. It would later turn out that I had indeed forgotten something, so maybe I need to listen to that voice a little more closely.
At that point the Caribou reports coming off the North Slope were not good. Weather was odd, bugs were down, the herd-up and migration had not materialized. Small groups of 'bou were being seen scattered about the tundra. I wondered, as I got caught up before the flight, what I would find.
 My initial flight was a short one to a connector in Minneapolis, from there direct to Fairbanks. It was a rainy, gloomy day and a precursor to the weather I was walking into in Alaska.
The flight is a long one, just under six hours and cuts a corner out of Canada along the way. At 37,000 feet there appears to be little other than lakes and wilderness below.

We dropped from our relatively clear weather into Fairbanks, of course it was cloudy and raining. Landing was uneventful. Happy to be back on the ground I grabbed my gear and headed for the rental cars, snapping the below as I passed out of the baggage claim area.

The plan was to overnight at a local hotel, then pick up the 'transport module' and head up the fabled Dalton Highway, also called 'The Haul Road'. First night was spent in the comfort of the Alpine Lodge Hotel in Fairbanks, mere minutes from the airport. As a plus, the Alpine Lodge offers amenities to hunters that you don't find at most hotels, like a freezer for your meat, clean up area, rack and gear storage, high pressure wash as well as a game cleaning station. There is also the 'Finish Line' restaurant behind the hotel with reasonable food and cold beer. Of note, the Alpine also keeps you well abreast of exactly where you are;

The Haul Road
The drive up the Alaskan interior was as much of an attraction as the caribou hunt on the North Slope.


When it was all said an done, over 1,100 miles were driven, an adventure in itself! Along the way the Arctic Circle would be crossed and on the return a night camped on the circle, Coldfoot, Wiseman, and Chandalar, as well as the northern most spruce tree in existence, then through the Atigun Pass and on to the tundra. Stopping about 55 miles south of Prudhoe Bay where the float plane would fly still further into the wilderness.
Visual log of the drive up the Haul Road.


Arriving at the outfitter's demarcation point at around 11:30pm after driving for close to twelve hours I was dragging. No amenities here, nor would there be for the next 10 days. So I hastily set up the Kifaru Megatarp, tossed by sleeping bag in place and inflated the neoair xtherm pad, I was asleep almost right away. Wind was up, fog to the ground, temps in the 30s and rain falling.
The next day was more of the same, fogged in again and the pilots were not flying. I didn't take many pictures, the landscape was nil, visibility not much beyond a hundred yards, camp was cold and damp and windy.
My shelter, DustinF's behind and left, with Throc's on the right in the back.

This was the scene the next morning, dawning cold with a good frost on.


The bushpilot had others to get into the field so it was time for some coffee. The wind on the tundra was on the high side of excessive, so 'Throc' knocked together a wind break from scavenged wood around the outfitters base.

A camp visitor....

Eventually the outfitter was caught up and it was our turn to fly out. The weather had been excessively bad and hunters were trapped on the tundra. When it was time to go I learned that I'd be going to the furthest lake he had in the area, called Cache One Lake which lay at the foot of an unnamed mountain range and about a mile north of the Echooka River.


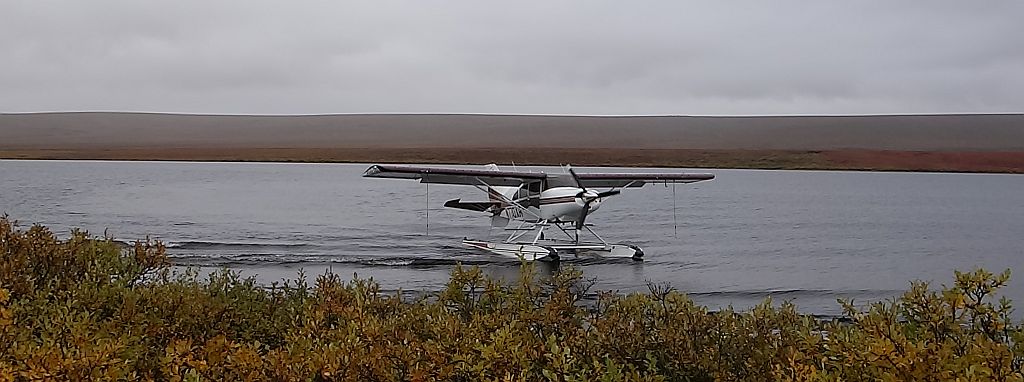


I watched the float plane get off the water and go for altitude, as he faded from sight I turned, I started up the rise from the lake in order to get camp started and I nearly stepped in a pile of grizzly scat.
I grinned ear to ear.
To be continued...


